Create a forum
As a Page administrator, you design your class Pages by adding widgets. The Forums widget is a place where you can foster online discussions with users.
A forum can have multiple topics to help direct the conversation. For example, during a world history unit, you could have a forum titled "The Post-Classical Era", with three topics that span the entire unit: Early Middle Ages, High Middle Ages, and Late Middle Ages. For each topic, users can either reply to another user's post or create a new post.
One example of how you could use this is for a flipped lesson. You want to flip a world history lesson to introduce the Middle Ages. First, you can create a forum asking students to post their thoughts about an assigned article in preparation for the in-class activity. Then, after the class meets, you and the students can respond to the initial posts to continue the discussion.
Learn how to do the following:
Moderation
Forums can be moderated or unmoderated. In the
If a forum is moderated:
- You have to approve a post before it is available for all members to view and respond to.
- You can edit a post before or after approving it (details of who edited it, when, and how many times appear for all members to see).
- After you approve a post, if you realize that you should not have, you have the option of hiding it (Page administrators can still see it).
- You can reject a post (Page members never see it, but Page administrators can).
If a forum is unmoderated:
- Anyone with access to a particular Page is able to post any content.
- The only way to shield a post from members is for the Page administrator to hide it after it has been posted.
Photos
At the
|
Note: A silhouette
also appears next to each poster's name if the |
Read vs. unread messages
At the forum, topic, and post level, Aspen displays one of the following:
- a closed envelope icon
 to let you know that there are unread posts
 - an open envelope icon
 to let you know that you have already seen all of the posts
To create a forum and set its moderation status:
- At the top of the Forum widget, click Add Forum. The widget box expands.
-

- Type a title, such as The Post-Classical Era.
- Select the Moderated checkbox if you want this forum to be moderated.
- Click Save.
Note: Once you have saved a forum, you can edit its title and moderation status or delete the forum by clicking
 .
.
- Under Discussion Forum Title, click the forum name. A New Topic button appears.
- Click New Topic.
-

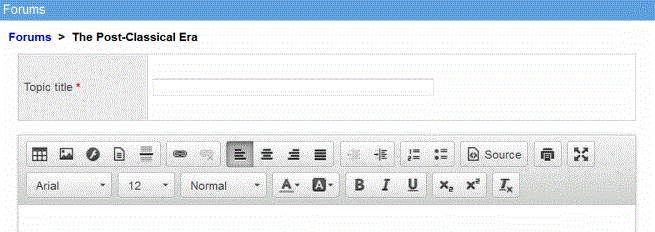
- Type a Topic title, such as Early Middle Ages.
- Type the entry, using the rich
text editor tools, if desired.
Notes:
- There are several ways you can enhance the discussion:
- Users have the same rich text editors available to them when they reply to a post.
- In the Forum widget, view the list of posts. A red (M) appears next to any forum containing posts that are awaiting approval.
- Click the discussion forum title to view a list of topics.
-

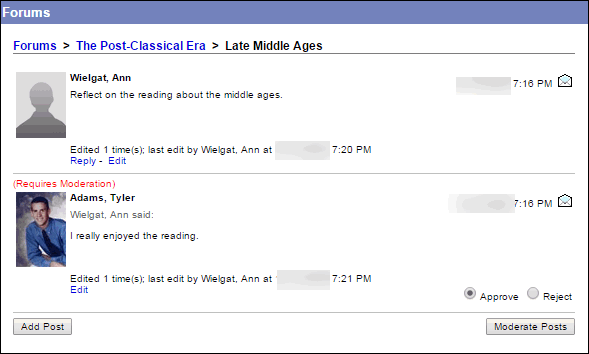
- Click a topic which has an (M) next to it to view the posts awaiting moderation.
-

- Do one of the following:
- Click Reply to reply to the post you are viewing, then click Save. Your reply will be viewable by all members.
- Click Edit to edit the post the user submitted, then click Save. The details of who edited the post, when, and how many times appear for all members to see.
- By default, all posts are set to Approve. Leave this option selected if you want to make the post available for all Page members to see.
- Select the Reject
option if you want to delete the post. Page administrators can still
see the post, with (Post Rejected)
above the poster's photo.
Note: Once you approve a post, if you change your mind, you have the option of hiding it. Posts can be hidden in both moderated and unmoderated forums.
- After you have selected Approve or Reject for all applicable posts, click Moderate Posts. Posts that you approved are viewable by all members, and posts you rejected are hidden.
- To hide a post after it has been approved, click Edit on the bottom of the post, then click Hide. Page administrators still see the hidden post, but with (Post Hidden) above the poster's photo.
