Add content to a survey
Once you have the basic parameters of the survey set, you need to define its content. This involves typing the questions and, when appropriate, the responses that participants can pick from.
To add content to a survey:
- In the Survey widget, click the Questions sub-tab.
- Click Add. The Question Set Response Definition pop-up appears:
-

- Use the Type drop-down to select one of the following:
-
Field
Description
Date
This is a date field. The user can either type a date or click
 to select one.
Likert-Scale
This scale is used to understand how much someone agrees/disagrees with a given statement. If you select this type, you do not need to enter any responses.
They appear automatically as follows: Strongly Disagree, Disagree, Neutral, Agree, Strongly Agree.
Note: Be sure to phrase your statement so that these responses make sense. Multiple Choice
(Radio button - select 1)
Selections appear as options, and the user can only select one. Commonly used for true/false questions. Multiple Choice
(Dropdown - select 1)
Selections appear in a drop-down, and the user can only select one. Multiple Choice
(Checkboxes - Select any)
User can select as many checkboxes as they want.
OR (Open Response)
Free Text/Essay
The user can type any response, short or long. SA (Short Answer)
The user can type a short response.
Time
This is a time field. The user can type a time.
Note: This functions like a standard time field and will be automatically formatted.
- Type a number in
the Sequence number field.
This tells the system in which order to arrange your questions.
Note: The default value is 0. If you do not change this value, questions will appear in the order that you type them.
- In the text box, type your question (or statement), using the rich text editor tools, if desired.
- Determine whether your question type requires you to enter responses for the user to select from. Do one of the following:
- If you select a Type of Date, Free text/essay, Likert-Scale, or Time, you do not need to add responses for the user to pick from. Click OK to save your question. Proceed to step 12.
- If you select any of the multiple choice types, you need to type responses for the participant to select from. Proceed to step 7.
- Use the following table to fill in the fields:
-
Field
Description
Answers
Type one of the responses you want users to select from.
Note: If your text does not fit in the small text box, click  to expand the size of this field. The expanded field includes
a spell checker. Click
  to have your text spell-checked.
Order
If you do not want your responses to appear in the order that you enter them, type a number representing the desired position. For example, to have a response appear second, type 2. You can also drag the options to appear in the order you want them. Click anywhere in the Order cell to do this.

Note: If you want the responses to appear in the order that you enter them into the system, do not change the default value of this field, which is 0.
- After you fill in the first field, do
one of the following:
- If you have more responses to add, proceed to step 10.
- If you are done adding responses for this particular question, click OK in the row that you are working in. Proceed to step 12.
- Click Add. The response you typed is moved to its own row, and a new row appears.
- Repeat steps 8-9 for each additional response you want to appear for the question you are working on.
-

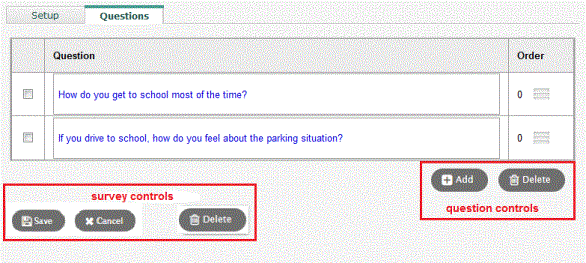
- When you are done adding all of the responses, click OK at the bottom of the pop-up. Each question that you typed appears as its own row:
-

- Do one of the following:
- To add another question, click Add.
- To delete a question, select its checkbox and click Delete on the right side of the pop-up.
- To save and exit your survey, click Save.
- To delete the entire survey, click Delete on the left side of the pop-up. You will see a warning message. Click Continue or Cancel.

